Do you have a Raspberry Pi computer, perhaps for a fun project, learning to code, or even for something bigger in a small business setting? It's a wonderful little machine, making computing truly open and affordable for many people, from the kitchen table tinkerer to the classroom coder, as Raspberry Pi Holdings PLC helps make possible. Sometimes, though, you might want to work with your Pi without having a monitor, keyboard, or mouse plugged right into it. That's where getting free Raspberry Pi remote access with SSH comes in, and it's simpler than you might think, really.
Imagine being able to control your Raspberry Pi from another computer, perhaps your main desktop or a laptop, no matter where it is in your home or even further away. This kind of freedom lets you place your Pi anywhere convenient, maybe tucked away in a cupboard, or perhaps even in a remote location for a special project. It really changes how you can use these small, yet very capable, computers, so you can focus on what you want to build or learn.
This guide will walk you through exactly how to set up this handy feature using SSH, which stands for Secure Shell. It's a method that lets you talk to your Raspberry Pi over a network, all without needing extra screens or keyboards. We will cover everything you need to know to get started, helping you make the most of your Raspberry Pi, and yes, it's completely free to do, which is rather good.
Table of Contents
- What is SSH and Why It Matters for Your Raspberry Pi?
- Is SSH for Raspberry Pi Truly Free?
- Getting Your Raspberry Pi Ready for SSH Connections
- Making the Connection to Your Raspberry Pi with SSH
- Basic SSH Commands to Start With
- Keeping Your SSH Connection Safe and Sound
- Beyond the Basics: More Things You Can Do with Remote Access
What is SSH and Why It Matters for Your Raspberry Pi?
SSH, or Secure Shell, is a way to get into a computer from another computer over a network, like the internet. It provides a secure channel over an unprotected network by using strong encryption. This means that whatever you send back and forth, like commands or files, stays private, which is pretty important, you know.
For your Raspberry Pi, SSH is incredibly useful. It lets you run commands, change settings, and even move files without having a screen or keyboard hooked up. This is often called running your Pi "headless." It's a bit like having a remote control for your computer, giving you freedom to place your Pi wherever it makes the most sense for your project, which is rather convenient.
Think about building exciting physical computing projects or learning how to code your own programs. The Raspberry Pi Foundation, for example, helps young people realize their full potential through computing and digital technologies. With SSH, you can set up your Pi in a robot, or maybe a smart home device, and still have full control over it from your main computer. This makes working on those projects much easier, and you can really focus on the creative side, you see.
Is SSH for Raspberry Pi Truly Free?
Yes, absolutely. The method we are talking about for Raspberry Pi remote access using SSH is completely free. You don't need to buy any special software or pay for any services to make it work. The tools you'll use are built right into Raspberry Pi OS or are freely available programs for your other computer, so that's a good thing.
The Raspberry Pi Foundation itself provides access to online coding resources and challenges that are free for everyone, anywhere. This spirit of accessibility extends to how you can interact with your Pi. Getting started with your Raspberry Pi computer for free is a core part of its mission, and remote access via SSH fits right into that idea, so it's a perfect match.
You'll just need your Raspberry Pi, a power supply, a microSD card with Raspberry Pi OS on it, and a network connection. That's pretty much it. No hidden costs or subscriptions for this essential way to connect, which is very helpful for tinkerers and learners alike, too it's almost.
Getting Your Raspberry Pi Ready for SSH Connections
Before you can connect to your Raspberry Pi using SSH, you need to get a few things set up on the Pi itself. These steps are pretty straightforward and will make sure your Pi is listening for your remote commands, you know.
Installing Raspberry Pi OS the Right Way
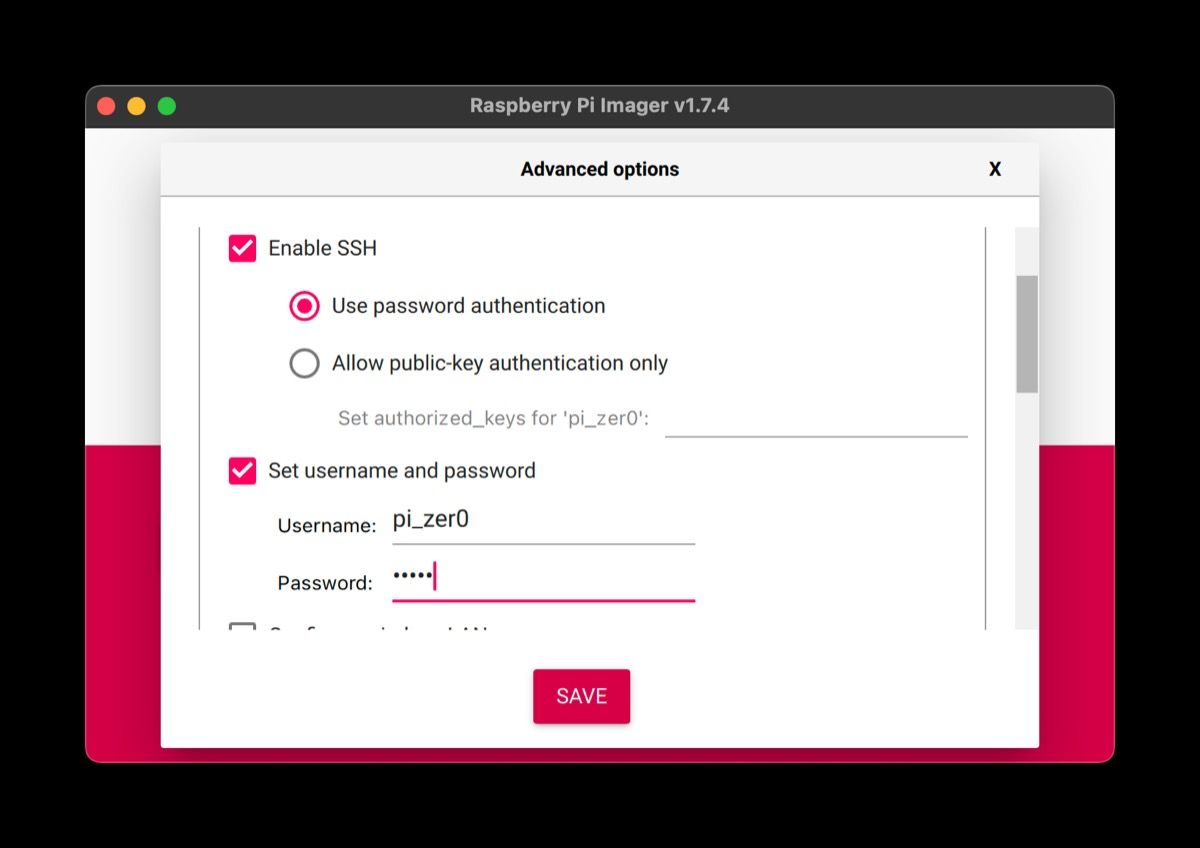
First things first, your Raspberry Pi needs an operating system. The official choice is Raspberry Pi OS, and the easiest way to put it onto a microSD card is by using Raspberry Pi Imager. Raspberry Pi Imager is the quick and easy way to install Raspberry Pi OS and other operating systems to a microSD card, ready to use with your Raspberry Pi, you see.
When you use Raspberry Pi Imager, there's a neat little trick you can do to make SSH setup even simpler. Before you write the operating system to your card, click on the "Settings" gear icon in the Imager. Here, you can actually enable SSH, set a username and password, and even configure Wi-Fi credentials. Doing this now means you won't need to plug in a monitor or keyboard to your Pi later, which is rather handy, actually.
If you don't use the Imager's settings feature, you'll need to enable SSH manually after the OS is installed. But using the Imager's built-in options saves you a step and gets you to remote access faster, which is pretty nice.
Turning On SSH on Your Raspberry Pi
If you didn't enable SSH using Raspberry Pi Imager's settings, you can still turn it on. There are two common ways to do this once Raspberry Pi OS is on your microSD card. One way is very quick, and the other involves a menu, so you have options.
Method 1: Create an 'ssh' file (Headless setup)
This is the best method if you don't have a monitor or keyboard for your Pi. After you've written Raspberry Pi OS to your microSD card with Imager, but before you put the card into your Pi, take it out of your computer and then put it back in. You should see a drive pop up, often called 'boot'.
On this 'boot' drive, simply create an empty file named `ssh` (no file extension, just `ssh`). You can do this by opening a text editor, saving an empty file as `ssh`, or on Linux/macOS, using the command `touch /Volumes/boot/ssh`. When your Raspberry Pi starts up with this card, it will look for that `ssh` file and automatically enable the SSH server, which is quite clever, really.
Method 2: Using `raspi-config` (Requires monitor/keyboard)
If you have a screen and keyboard connected to your Raspberry Pi, you can enable SSH through the `raspi-config` tool. Open a terminal window on your Raspberry Pi's desktop. Then, type `sudo raspi-config` and press Enter.
A blue menu will appear. Use your arrow keys to go down to "Interface Options" and press Enter. Then, select "SSH" and press Enter again. It will ask if you want to enable the SSH server. Choose "Yes" and press Enter. After that, you can select "Finish" and restart your Pi. This way works just fine, too.
Finding Your Raspberry Pi's Network Address
To connect to your Raspberry Pi, you need to know its IP address on your local network. This is like its unique street address on your home network. There are a few ways to find this, so you can pick what works best for you.
Option 1: On the Raspberry Pi itself (with monitor/keyboard)
If you have a screen and keyboard connected, open a terminal window on your Pi. Type `hostname -I` (that's a capital 'i') and press Enter. Your Pi's IP address will show up, which is very direct, you know.
Option 2: Check your router's connected devices list
Most home routers have a web interface where you can see all the devices connected to your network. You usually get to this by typing your router's IP address (often something like `192.168.1.1` or `192.168.0.1`) into a web browser. Look for a section like "Connected Devices" or "DHCP Clients." Your Raspberry Pi might show up as "raspberrypi" or by its MAC address, and its IP address will be listed next to it, which is pretty common.
Option 3: Use a network scanner tool
There are free tools you can install on your computer or phone that scan your network and list all connected devices and their IP addresses. Programs like Fing or Advanced IP Scanner can do this. They are quite helpful if you have many devices on your network and need to find your Pi quickly, and they are usually very simple to use.
Making the Connection to Your Raspberry Pi with SSH
Once SSH is enabled on your Raspberry Pi and you know its IP address, you're ready to connect from another computer. The steps are a little different depending on whether you're using Windows, macOS, or Linux, so let's look at both, so you know what to do.
Connecting from a Windows Computer
On Windows, the most popular tool for SSH connections is a free program called PuTTY. It's a small, standalone application that works very well, so it's a good choice.
- Download PuTTY: Go to the official PuTTY website and download the executable file. You don't usually need to install it; you can just run it directly.
- Open PuTTY: Double-click the PuTTY executable to open the program.
- Enter your Pi's IP address: In the "Host Name (or IP address)" field, type the IP address you found for your Raspberry Pi. The "Port" should be 22, which is the standard port for SSH. Make sure "Connection type" is set to "SSH."
- Save your session (optional): If you plan to connect often, you can type a name for this connection (like "My Pi") in the "Saved Sessions" box and click "Save." This way, you can just double-click it next time.
- Open the connection: Click the "Open" button.
- Security Alert: The first time you connect, you might see a security alert about the host key not being cached. This is normal. Click "Accept" to continue.
- Log in: A terminal window will open. It will ask for `login as:`. The default username for Raspberry Pi OS is `pi`. Type `pi` and press Enter.
- Enter password: It will then ask for `password:`. The default password is `raspberry`. Type `raspberry` and press Enter. (Note: You won't see characters appear as you type the password, which is normal for security.)
If everything goes well, you'll be logged into your Raspberry Pi's command line! You'll see something like `pi@raspberrypi:~ $`. Now you can type commands directly to your Pi, which is pretty neat.
Connecting from a macOS or Linux Computer
Good news if you're on macOS or Linux: SSH is usually built right into the operating system. You don't need to download any extra software like PuTTY. You'll just use the Terminal application, which is very convenient.
- Open Terminal: On macOS, you can find Terminal in Applications > Utilities. On Linux, it's usually in your applications menu, often under "Accessories" or "System Tools."
- Type the SSH command: In the Terminal window, type the following command, replacing `[Your_Pi_IP_Address]` with the actual IP address of your Raspberry Pi:
ssh pi@[Your_Pi_IP_Address]For example, if your Pi's IP address is `192.168.1.100`, you would type:
ssh pi@192.168.1.100Then press Enter.
- Security Prompt: The first time you connect, you might see a message asking if you want to continue connecting because the authenticity of the host can't be established. Type `yes` and press Enter.
- Enter password: It will then ask for `pi@192.168.1.100's password:`. The default password is `raspberry`. Type `raspberry` and press Enter. (Again, you won't see characters as you type the password.)
Once you've entered the correct password, you'll be connected to your Raspberry Pi's command line. You'll see the `pi@raspberrypi:~ $` prompt, ready for your commands, so that's it.
Basic SSH Commands to Start With
Now that you're connected, here are some simple commands you can use to start interacting with your Raspberry Pi. These will help you get a feel for working in the command line, which is very useful, you know.
- `ls`: This command lists the files and folders in your current location. It's like looking inside a folder on your computer.
- `cd [folder_name]`: This command lets you change directories (folders). For example, `cd Desktop` would take you to the Desktop folder.
- `pwd`: This stands for "print working directory." It shows you which folder you are currently in, which can be helpful if you get a little lost.
- `sudo apt update`: This command updates the list of available software packages. It's good to run this regularly to make sure your Pi knows about the latest programs.
- `sudo apt upgrade`: After updating the list, this command actually installs any available updates for the software on your Pi. It's important for keeping your system current and secure, really.
- `reboot`: This command restarts your Raspberry Pi. You might need to do this after installing updates or changing some settings.
- `sudo shutdown now`: This command turns off your Raspberry Pi safely. Always use this instead of just unplugging it to avoid damaging your microSD card, which is quite important.
- `exit`: This command closes your SSH connection and takes you back to your local computer's terminal or PuTTY window.
These commands are just the start, but they give you a good foundation for controlling your Raspberry Pi remotely, which is very empowering, you see.
Keeping Your SSH Connection Safe and Sound
While SSH provides a secure way to connect, there are steps you should take to make your Raspberry Pi even safer, especially if you plan to access it from outside your home network. Security is pretty important, after all.
- Change the default password: The first and most important step is to change the default `raspberry` password. Anyone who knows this default password could get into your Pi. To change it, type `passwd` in your SSH terminal and follow the prompts. Pick a strong, unique password, please.
- Create a new user and disable the 'pi' user: For even better security, create a new user account with `sudo adduser [your_new_username]`, then give it administrative rights with `sudo usermod -aG sudo [your_new_username]`. Once you've tested that the new user works, you can disable the 'pi' user or remove it. This makes it harder for someone to guess your login details, which is a good idea.
- Use SSH keys instead of passwords: For the highest level of security, consider setting up SSH key authentication. This involves creating a pair of cryptographic keys (a public key on your Pi and a private key on your computer). You don't type a password; instead, the keys prove your identity. This is much more secure than passwords, and there are many guides online to help you set it up, so it's worth looking into.
- Keep your Raspberry Pi OS updated: Regularly run `sudo apt update` and `sudo apt upgrade` to make sure your system has the latest security fixes. The Raspberry Pi Foundation encourages learning and provides official documentation for Raspberry Pi computers and microcontrollers, which often includes security advice.
- Limit external access: If you plan to access your Pi from the internet (outside your home network), be very careful. Only open the SSH port (22) on your router if absolutely necessary, and consider using a VPN or changing the default SSH port to a less common one. This adds layers of protection, which is very smart.
Taking these steps will help keep your Raspberry Pi and your data safe while you enjoy the convenience of remote access, which is something you really want.
Beyond the Basics: More Things You Can Do with Remote Access
Once you've mastered free Raspberry Pi remote access with SSH, a whole world of possibilities opens up. You're not just limited to typing commands; you can do so much more with your Pi from a distance, which is very exciting.
- Develop programs: You can write powerful programs directly on your Raspberry Pi using text editors accessible via SSH, or you can transfer your code from your main computer. The Raspberry Pi Foundation offers free online computing classes in Python, teaching you how to code your own programs today. You can develop your Python scripts and run them on your Pi, even when it's tucked away, so that's a big plus.
- Build exciting projects: Remote access is perfect for physical computing projects. Imagine building a robot or a home automation system. You can learn electronics and robotics for free online with the Raspberry Pi Foundation, building exciting projects and controlling them with your computer, all via SSH. You can update code, check sensor readings, or even troubleshoot issues without having to physically connect to the device, which is rather convenient.
- Set up a server: Your Raspberry Pi can become a small server for various tasks. Maybe a web server, a file server, or even a media server. SSH allows you to manage these servers, upload content, and check their status from anywhere on your network, which is a very practical use.
- Automate tasks: You can schedule scripts to run at certain times on your Pi. With SSH, you can easily set up and modify these automated tasks, turning your Pi into a little helper for repetitive jobs, which is pretty clever.
- Learn more about computing: The ability to interact with a Linux command line remotely is a valuable skill. It's a great way to deepen your knowledge of operating systems and networking. The Raspberry Pi Foundation helps students get essential digital skills that prepare them for further study or the modern workforce, and learning SSH is definitely a part of that, you know.
The Raspberry Pi is a versatile tool for learning, creating, and innovating. Remote access through SSH just makes it even more flexible and powerful. To keep learning and building, you can find lots of helpful guides and documentation. Learn more about Raspberry Pi projects on our site, and for official resources, you can always check out the official documentation provided by the Raspberry Pi Foundation, so there's plenty to explore.
Frequently Asked Questions About Raspberry Pi Remote Access with SSH
Is SSH free for Raspberry Pi?
Yes, SSH is completely free for Raspberry Pi use. The software needed is either part of the standard Raspberry Pi OS or available as free, open-source programs for your other computer. You won't need to buy any special licenses or services to use SSH for remote access to your Pi, which is a big benefit, you know.
How do I enable SSH on Raspberry Pi?
You can enable SSH on your Raspberry Pi in a couple of ways. The easiest is during the initial setup using Raspberry Pi Imager's advanced options. Alternatively, after installing the OS, you can create


Detail Author:
- Name : Luther Quitzon
- Username : lcrist
- Email : monserrat.collins@hotmail.com
- Birthdate : 1982-10-27
- Address : 32047 Pagac Extensions Port Nedbury, NJ 04960-7027
- Phone : +14345575982
- Company : Feeney PLC
- Job : Financial Specialist
- Bio : Iure ut natus odio et. Et debitis in accusamus aut. Odit fugit qui non hic.
Socials
linkedin:
- url : https://linkedin.com/in/hipolito.casper
- username : hipolito.casper
- bio : Qui ut ratione earum asperiores.
- followers : 943
- following : 2737
tiktok:
- url : https://tiktok.com/@hcasper
- username : hcasper
- bio : Quo quia beatae totam architecto quibusdam et blanditiis.
- followers : 3275
- following : 1434
facebook:
- url : https://facebook.com/hipolito2272
- username : hipolito2272
- bio : Vel id molestiae quibusdam eos quo.
- followers : 1067
- following : 2446
twitter:
- url : https://twitter.com/hipolito_casper
- username : hipolito_casper
- bio : Exercitationem voluptatem ex ut laboriosam esse qui. Beatae voluptas perspiciatis ut sunt omnis. Distinctio reprehenderit rerum nihil iusto.
- followers : 5350
- following : 1095
